I started a new sewing project yesterday with a new Japanese black cotton fabric that I picked up at Britex...and no, it's not the ugly print that I referred to in the title of this post. This fabric is pretty, soft and floral. It has a nice weight and feel to the fabric. The ugly fabric that I am referring to happens to be found on a lovely structured and cut Nine West dress that I came across while internet shopping.
I found the dress on Dillards.com and I really liked the ruffled style at the collar and length. I did find that the weird pink, yellow and brown Aztec/floral print to be a bit disarming. But I shop like an idiot sometimes and impulse buy. So I was close enough to buying it, until I saw the price. $237.00, eeek. In my mind, I know that there are a lot of other very important things I could be buying, besides a $237.00 dress with a weird Aztec/floral print that I kinda liked. So I searched for an old dress pattern in my fabric bin and found one that I could alter, similar to the Nine West dress.
I began by finding a simple pattern that also had a ruffled collar. (Would you believe that I picked up the pattern at a Walmart?! For a $1!) I cut out the pattern to my body size and pinned it to my fabric. If your pattern pieces have been sitting around for a while in an old storage bin and are wrinkly, like mine, just press them with a low set and warm iron.
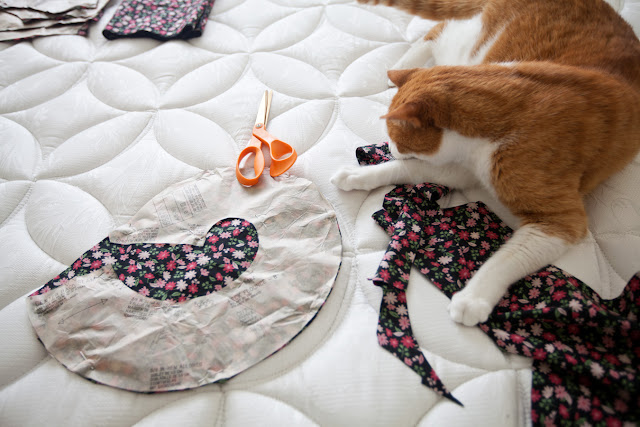
The best thing about patterns is being able to create sizes that fit your body. For example, I have a small chest, wide waist and a long torso. Not exactly a perfect size that fit within the pattern size chart. So I was able to mix and match to find a perfect "me" fit. [Note on picture: You should always fold your fabric wrong side out and then pin on your pattern pieces. That way you can easily draw any markers from the pattern onto your fabric. I only worked with it right side out to show the fabric pattern.]
Cut out your patterns. And transfer any marks from the pattern onto your fabric. Also be sure to pin and cut out any interfacing that is needed for the dress. Here you can see fabric cat terrorizing my fabric and patterns...
I started with the top and took in the front darts. Always do a sample try on to check the fit. I then sewed the top shoulder and side seams together. I used a felled seam to give the seams a finished look.
Next, I worked on the ruffle for the collar. I had to double fold the outer edges of the ruffle by pinning in place and ironing.
My next step was to pin the ruffle onto the top piece right sides facing out. I matched the markers that I had originally made on the fabric to align the collar perfectly.
This is my progress so far. Next, I'll need to attach the ruffle with biased tape, structure the skirt and attach to the top piece. This dress is by far a simple silhouette compared to the Nine West dress, but hey, it's hundreds of dollars cheaper and made by me, for me!
These next few weeks will be getting a bit crazy, since our apartment will be known as "Hotel ThomandErin". I have one of my oldest friends coming to visit this weekend and then next week BOTH of Thom's brothers will be staying with us for a while. So for now, I had to break this post up. I'll be posting the next few steps when I can get a break from playing hostess. I hope everyone has a great Friday!


I know I'm not supposed to like Wal-Mart. But when they sell patterns for $1, who could stop themselves?! You're lucky your WM still has a fabric department.
ReplyDeleteYeah it's weird because that was probably the best reason for going there. Now that I live out west, there aren't any...so no cheap deals!
ReplyDeleteHi, I saw your finished dress and it is BEAUTIFUL! What pattern did you use to make the dress?
ReplyDeleteI ended up using this 5-1 dress pattern from Walmart that I bought a few years ago. A honestly great place to find cheap patterns that are easy to alter. :-)
ReplyDelete